

I mainly use Fotosketcher by turning my photos to arty looks. My favorite is the watercolor effect. Here are some of my previous works done with Fotosketcher.


Recently at Sketchucation.com, many of our friends there use this with SketchUp and eventually the compilation of this work was publish by SKetchupartists.org HERE. As a teacher and practicing visual artist, I could never believe how much Fotosketcher could do. I tried to integrate Fotosketcher with my personal preference by using sketchup styles. Here is my SketchUp_Fotosketcher
Photoshop work-flow.
Step 1: Saving the different Layers.
The Sketchup Style
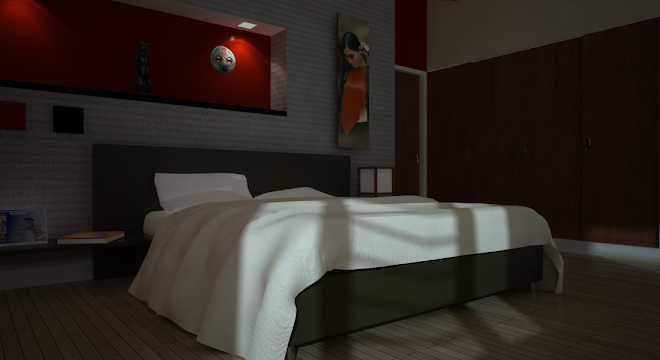
I used a model from the 3dWarehouse- "Mirasol5". I applied the blue ink style. Here is the result.

The Vray Sketchup Render Output
Since I just need the render image, I quickly render this image with just using native SketchUp materials.

Step 2: Converting the Vrayrender image into watercolor style in FotoSketcher
Next I have converted the Vray render image using FotoSketcher.

Here is the result.

Step 3. Combining the styles in Photoshop
Open Photoshop and load both the Fotosketcher result and the blue line style image in SketchUp. The blue Sketchup blue line style must be under the Fotosketcher layer. Then by using mask, start to paint black the outside edges with a fairly big size brush. In playing the elements of design, usually the colored part will be more noticeable; thus creating emphasis.

Step 4: Adding the water color paper texture
Although, Fotosketcher has its own built paper texture, I opted to put my texture using Photoshop. I created a new layer and pasted a watercolor paper. Below is the screen grab showing the hierarchy of the different layers.


I applied a "multiply"blending mode and 90% opacity.
Here is the finish product.

Nomer, this tutorial was fascinating! I've always wondered how this type of graphic effect was accomplished with photography and your tutorial made it interesting and user friendly to understand. I'm following you now & will definitely visit again! :)
ReplyDelete- Dawn
Healing Morning & Authentic Blogger
Nomer...I had no idea this could be done. As a sketcher and painter of the old ways..this is very interesting. Your step by step tutorial was also very helpful and helped to understand the stages in building the image. I too am following...
ReplyDeleteRavenmyth
http://ravenmyth.blogspot.com
Your art is beautiful and your tutorial made it very simple to follow. Thank you! I am following your blog and will be back to view more posts. I will have to try this on my photography.
ReplyDeleteRegards, Mari
http://www.mariscamera.blogspot.com/
i once tried almost similar software but this one you have to pay for it, called filterforge, it could do a lot more, btw thx for this
ReplyDeletehi nomer thanks for tutorial i wonder how do you make the "blue ink style" contour did you do this hand drawing
ReplyDeleteRegards, Volkan
hi Volkan, its one of those normal style in sketchup. called blue ink i think.
ReplyDelete