Integration of SketchUp to schools is fast becoming a norm. In our school we also use SketchUp. My students design their interior and furnishes, while Middle school students use SketchUp in connection with their Math studies.
I came up with this site dedicated in providing material for K-12 using SketchUp. Click it HERE.
Image courtesy of 3dvinci.net
Search

Custom Search
Welcome to My Blogsite
You will find on this blog a collection of my work mostly done in Google SketchUp and Rendered in either Vray for Sketchup, Hypershot, Vray Max, LightUp and Podium.
Download Free Google SketchUp Download Vray SKetchUp (you need to register in order to download)
Download Podium Evaluation copy Do you want to try Bunkspeed Shot? Click HERE.
Download Free Google SketchUp Download Vray SKetchUp (you need to register in order to download)
Download Podium Evaluation copy Do you want to try Bunkspeed Shot? Click HERE.
Monday, 30 May 2011
Friday, 27 May 2011
Thursday, 26 May 2011
SketchUp to 3dMax and VrayMax
I was asked several times by the readers with my work flow with Sketchup to Max. from 3dMax2010 with its connection, now 3DMax 2011 up can now open skp files without any problem. But for those people who are stull using the old 3dMax here is my workflow from SkethUp and how I preserve those textures.
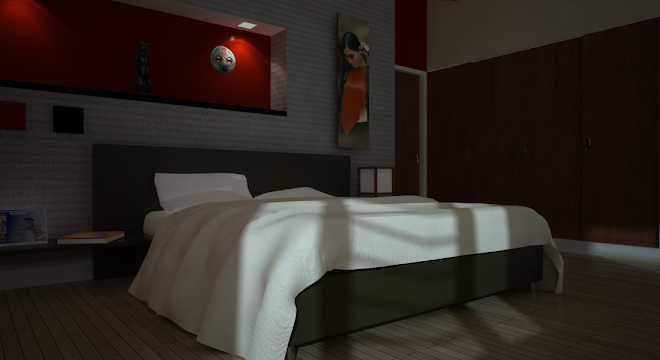
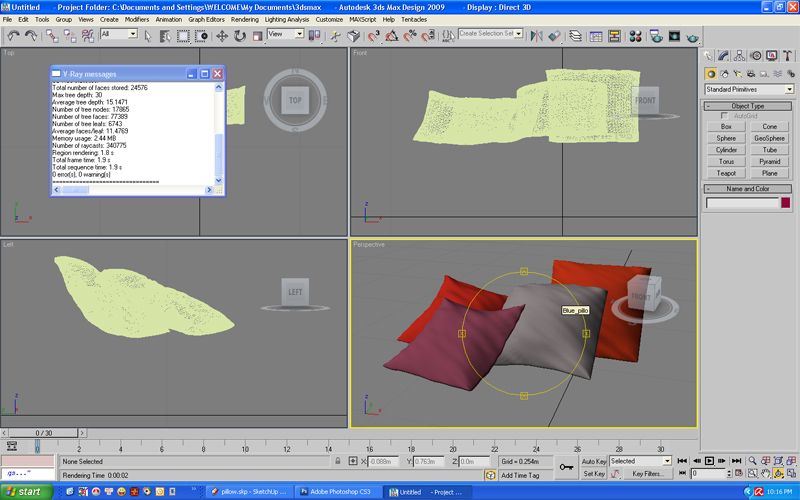
Here is the image that we will do.
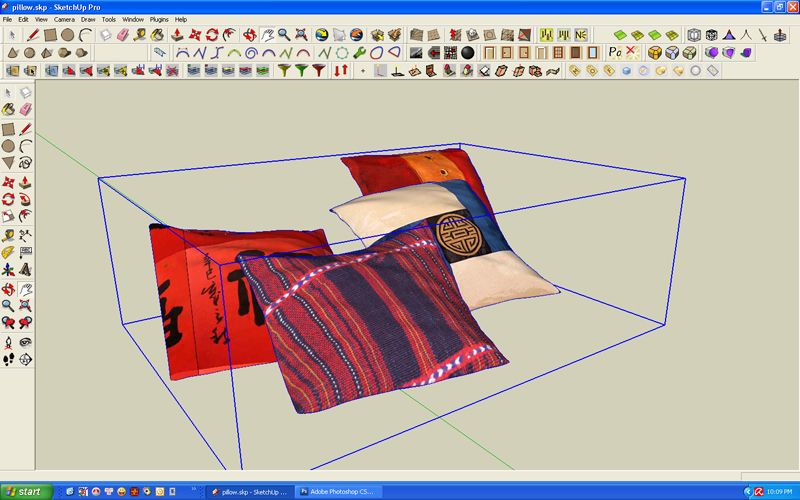
1. Here is the original SketchUp scene. I used the texture from form fonts for these pillows.
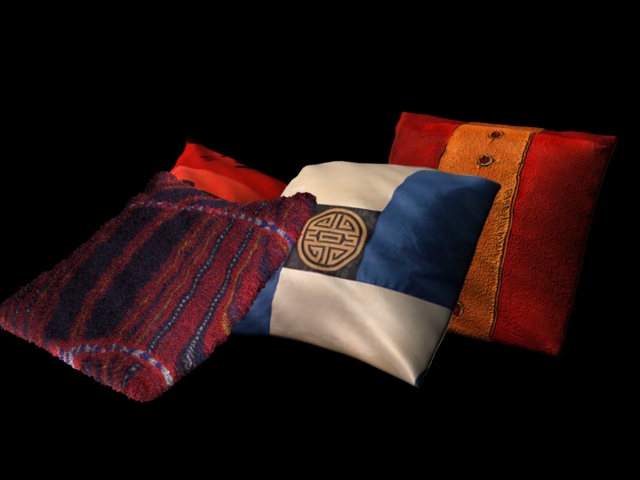
In SketchUp, I selected by texture and then group the components with the same materials, whic means in 3Dmax, all with the same materials will be inb one group.
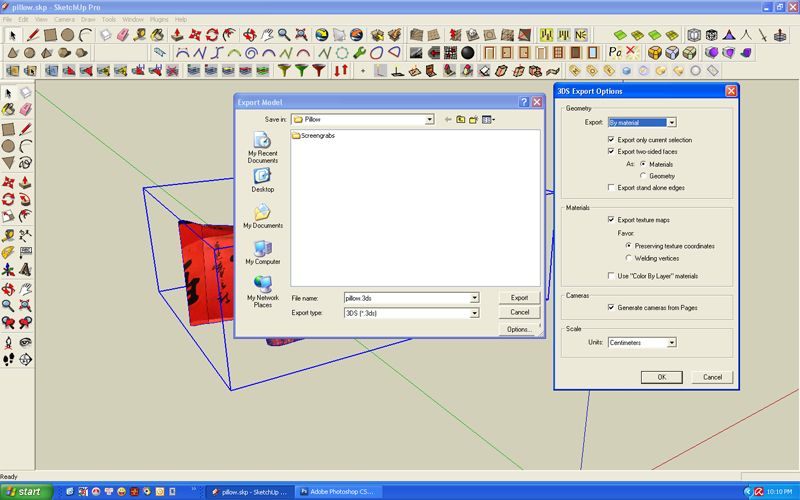
2. Export to 3ds file. Below is a screen grab that shows the settings how I exported my files.
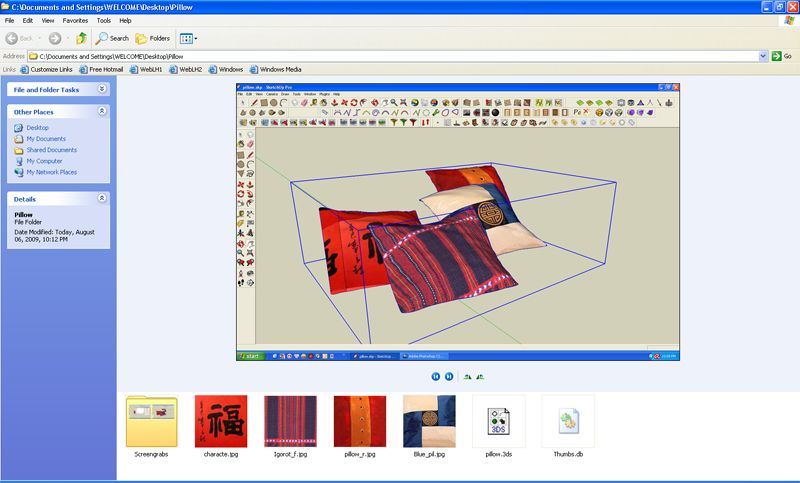
3. Be sure to create one separate folder for this exported files. As you can see on the image below all the materials that I used were placed on one folder.
4. Now open 3DMax and import the 3ds file.
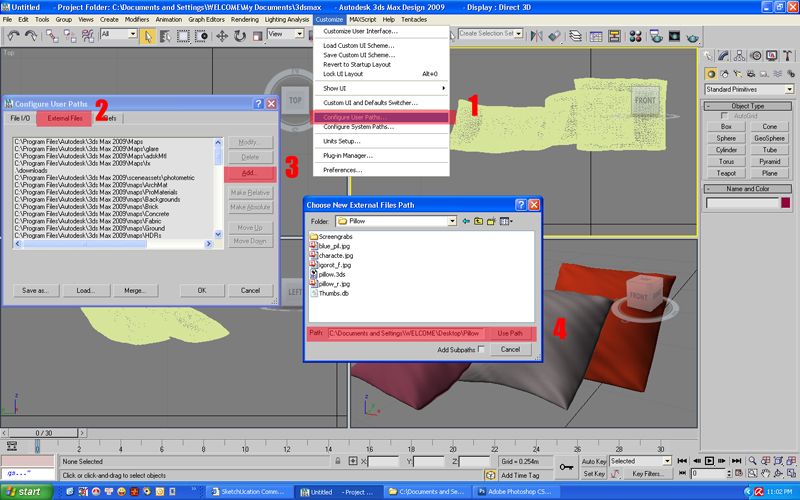
5. Configure Paths. Link the folder where your textures are, this way 3DMax can link them.
6. Once you linked the texture path, try to render the scene. You will see the textures are applied like in SketchUp.
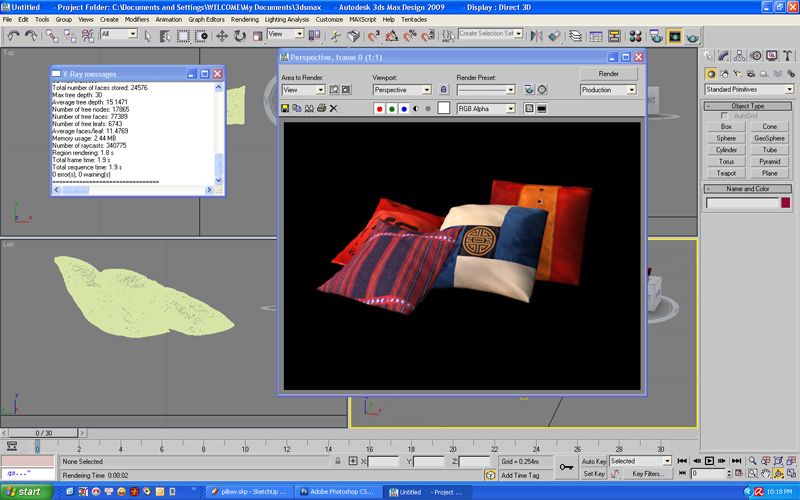
I dont want to stop there. I want to create vray materials and tweak further the Vray materials parameters.
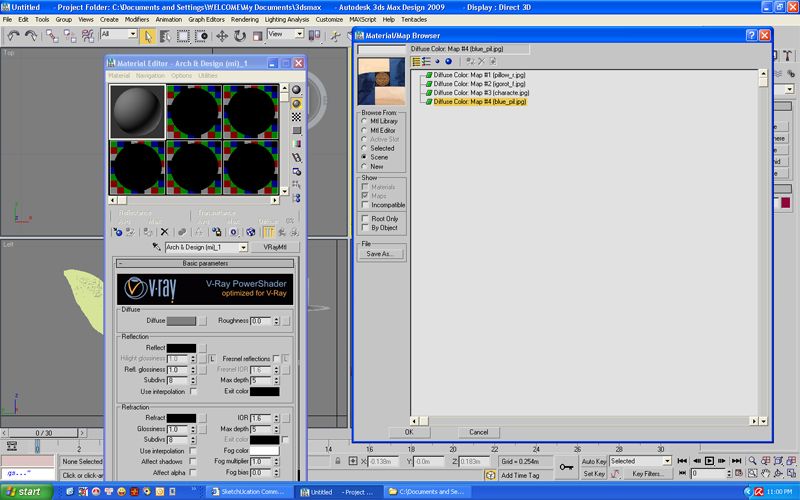
7. Using the eyedropper, click the material you want to convert into vray material. Onced clicked, create new vray material and on the diffuse slot box load your texture which are located on the material/map browser.
Alternatively you can automate the process by downloading the script to max plugins. http://www.scriptspot.com/3ds-max/vraymtlconverter-v2-5
Here is the image that we will do.
1. Here is the original SketchUp scene. I used the texture from form fonts for these pillows.

In SketchUp, I selected by texture and then group the components with the same materials, whic means in 3Dmax, all with the same materials will be inb one group.
2. Export to 3ds file. Below is a screen grab that shows the settings how I exported my files.
3. Be sure to create one separate folder for this exported files. As you can see on the image below all the materials that I used were placed on one folder.
4. Now open 3DMax and import the 3ds file.
5. Configure Paths. Link the folder where your textures are, this way 3DMax can link them.
6. Once you linked the texture path, try to render the scene. You will see the textures are applied like in SketchUp.

I dont want to stop there. I want to create vray materials and tweak further the Vray materials parameters.
7. Using the eyedropper, click the material you want to convert into vray material. Onced clicked, create new vray material and on the diffuse slot box load your texture which are located on the material/map browser.
Alternatively you can automate the process by downloading the script to max plugins. http://www.scriptspot.com/3ds-max/vraymtlconverter-v2-5
Wednesday, 25 May 2011
HDR done in VraySKetchup + Photoshop
This was an accidental discovery. I was rendering my sponza for virtual reality using exr file. Using photoshop I saved it with luminance and HDRI this spherical image. I then tried to use keyshot and used to do a test render.. Here are my quick results using keyshots. Less than a minute render for each image..
Download the HDR I made HERE
Download the HDR I made HERE
Special credit with "Michalis" with the statue.
Sunday, 22 May 2011
Virtual reality of Sponza using SketchUp and Vray
Here is my second VR. Using SPonza. I encourage you to see the original. rendered in 8000X4000px using vrimage
Sponza in Lazio
For easy viewing visit the site where this VR is being hosted.
http://www.360cities.net/image/sponza#0.00,0.00,70.0
OR you can download the VR image I did in PAno2VR HERE
You might be interested in viewing the tutorial on how to do this here:
PART 1
PART 2
My first Virtual Reality can be viewed HERE.
Friday, 20 May 2011
Nomeradona Mixed media approach_SketchUp, Vray and Photoshop
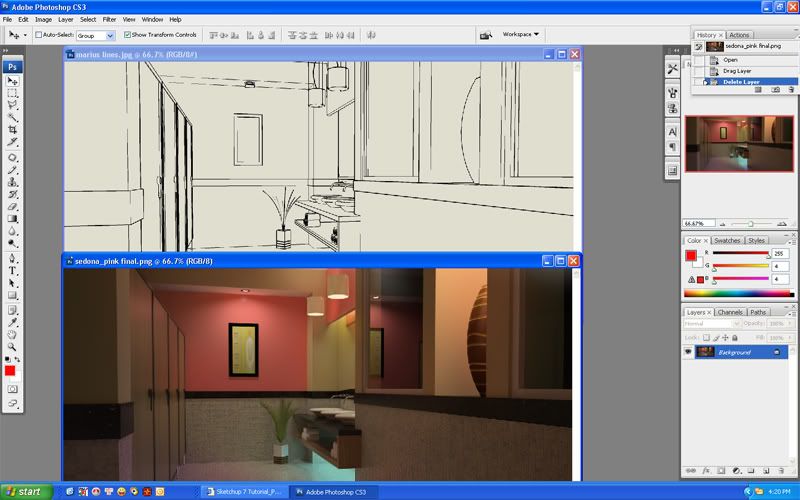
Here is a tutorial on how to use the different styles in Sketchup and merging them with rendered image in Photoshop thus creating a what we called "digital mixed media"
Although most of the work is in Photoshop, but one of the main aim here is how to explore the different styles in Photoshop.
In sketchup all you need to do is to export the image with style applied. In this tutorial, i will merge it with a rendered image. The good thing in SU is you can save camera scene.
So here are the two images openned in Photoshop.
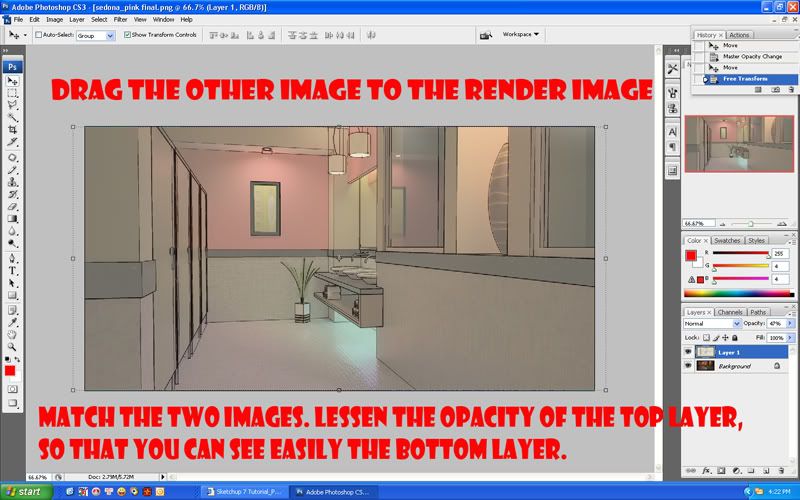
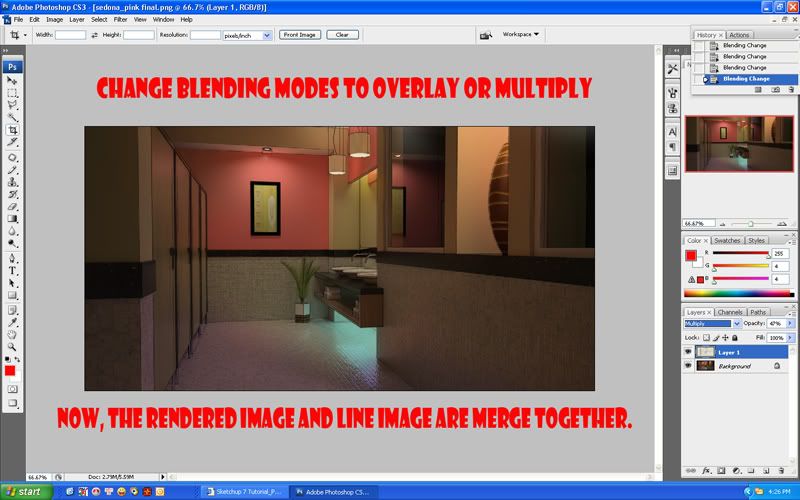
the second technique is not using blending modes but rather masking some part of the image to reveal the image below.
1. Add mask on the top layer.
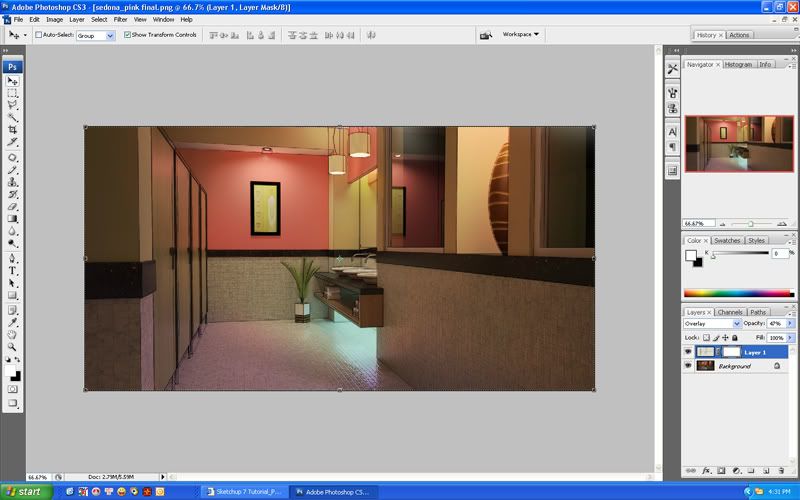
Then using gradient apply gradient (black to transparent) to top image. Now its up to you now which area you want to reveal.
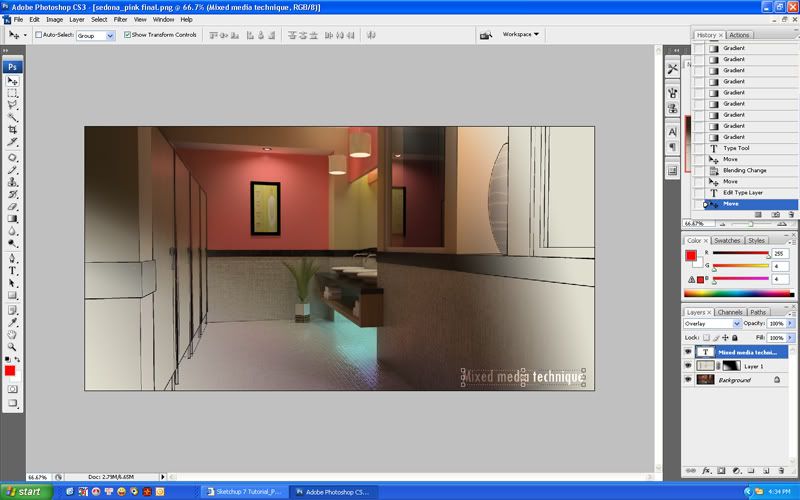
Although most of the work is in Photoshop, but one of the main aim here is how to explore the different styles in Photoshop.
In sketchup all you need to do is to export the image with style applied. In this tutorial, i will merge it with a rendered image. The good thing in SU is you can save camera scene.
So here are the two images openned in Photoshop.


the second technique is not using blending modes but rather masking some part of the image to reveal the image below.
1. Add mask on the top layer.

Then using gradient apply gradient (black to transparent) to top image. Now its up to you now which area you want to reveal.

Shaderlight
This renderer looks promising. I have not tried it yet bu the way the images in their flicker gallery plus promotional video, its seems the learning curve is pretty quick.
youtube video
youtube video
Thursday, 19 May 2011
Wednesday, 18 May 2011
Bent Reflection on glass glazings
There is uniformity with glass surface because of warping and unevenness like the image below.
I was challenge to produce this type of warping by one of our blog reader- how to produce this type of effects. Honestly I dont know. But I tried bumping it with no success, in the end i have to use displacement.
I created a displacement map like this in photoshop
I am still not happy wiht details, but i feel that its doable. Here is my preliminary test render.
Tuesday, 17 May 2011
Generating Seamless Diffuse, Normal, Bump, Specular and Displacement Maps
Generating Seamless Diffuse, Normal, Bump, Specular and Displacement Maps is possible in Phootshop. But there is no as easy as using softwares design to do this. I used Pixplant to do this.
Pixplant
This is actually my favorite, I can create easily texture using this. Here is the
Cobblestone Texture I created:
Cobblestone Diffuse Map
Cobblestone Displacement map
Cobblestone Normal map
Cobblestone Specular map
Here is the Video how it works
Pixplant
This is actually my favorite, I can create easily texture using this. Here is the
Cobblestone Texture I created:
Cobblestone Diffuse Map
Cobblestone Displacement map
Cobblestone Normal map
Cobblestone Specular map
Here is the Video how it works
Saturday, 14 May 2011
Ivy for Google SketchUp_Vray

This one by Thomas Luft has now a version in SKetchup done by Pierreden. You can try to download the latest beta HERE.
At first, I had a difficulty in loading it, the reason was I copied the files in Goggle Sketchup7 plugin folder. I did not realized that two of its skp files were actually done in SU8. If you want to use it, you either place the files at SU8 or you need to resave the files by opening them to SU8 and save them to SU7 or SU6 if you want it that way.
The second thing is this, if your intention is to render your image in VraySU you might want to consider changing the texture to png files to avail the support transparency map of the new Vray for SketchUp.
The attach image was my first test render using the script.
Click HERE to download the file.
Blogspot is back
Blogspot glitz. I lost some of my postings the other day. Anyway, I will just repost them later.
Monday, 9 May 2011
Virtual Reality Tutorial PArt 2
First of all if you are looking and interested with Panorama. This is a good site to visit. Click HERE.
It is important to Vray SketchUp will create your panoramas but not the movie. Therefore you will need a different piece of software - a "viewer" to display the panorama as a movie or in the web page. The viewer like Quicktime for instance need two things: first the image itself, and second the information about the image, such as whether it is 360 degrees wide or less than that, whether the image file is cylindrical2 or spherical2, cubic, fish eye, projection, etc. Using quicktime, flash are excellent since you dont have to use web to view them. All you need is a flash player movie or a quicktime movie.
Here is the simple workflow how to put now your spherical render.
Workflow 1: Using Pano2VR. You can download the shareware here.
Step 1: Open Pano2VR
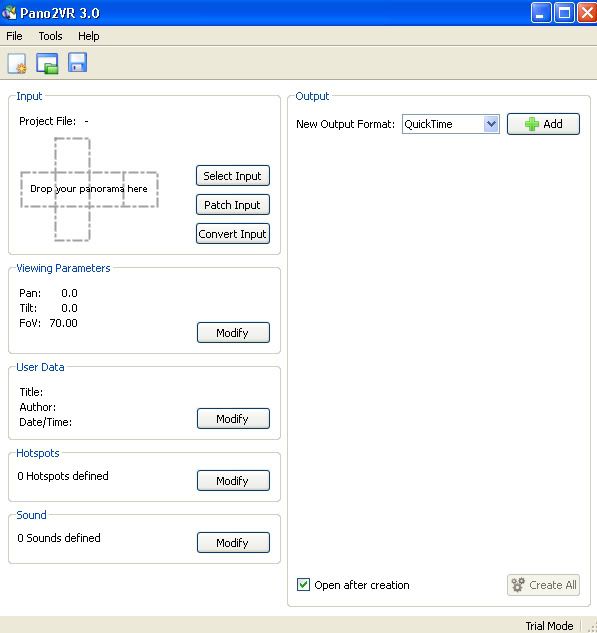
Step 2: Input
Type: Auto Panorama: Spherical
Browse the location of the rendered image in Vray SketchUp
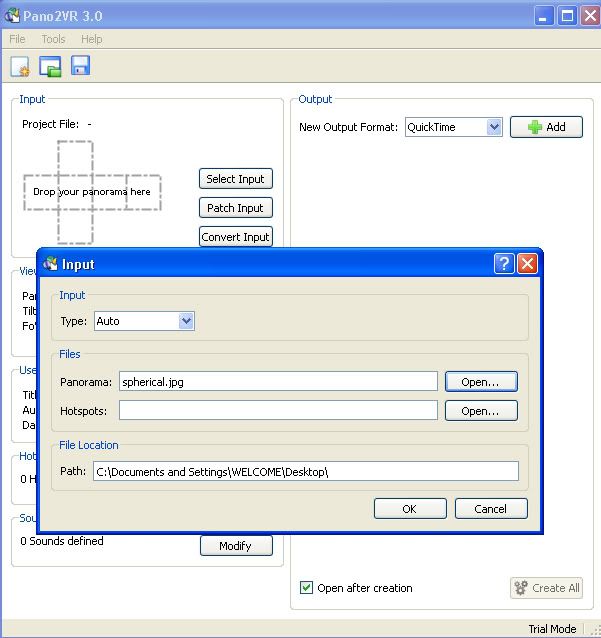
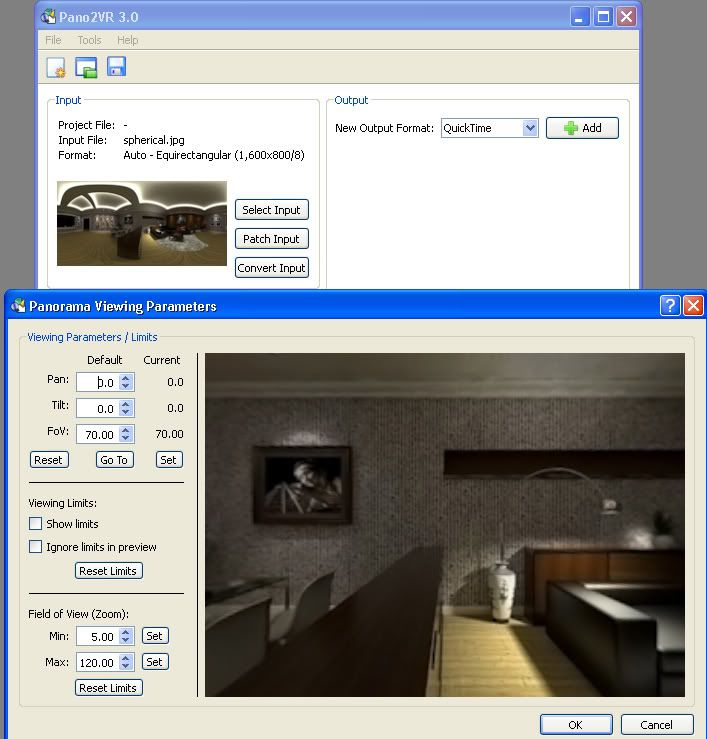
Step 3: Panorama Parameters
You can adjust the panorama parameters. In my case, I did not touch it.
Step 4: Output
Enter your output. In my case I used quicktime
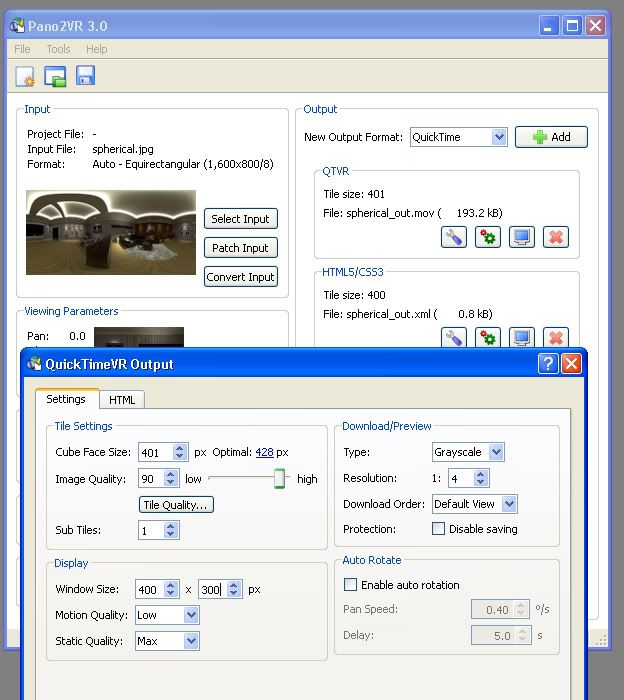
That's it.
Here is my finish one using pano2Vray shareware program. If you want to download click HERE.
Some other workflow as follows:
Workflow 2: Using GoCubic
Tutorial from Panoguide HERE.
Workflow 3: Using Pano Press
Another cool way using using PanoPress. You have to have Wordpress install
1. Download & unzip Panopress
2. Upload Panopress to your wp-plugins folder
3. Activate Panopress in your WordPress admin plugins page
4. Configure Panopress settings in the admin page
5. Optional: Upload your KRPano or Flash Panorama Player global swf file if you are using PanoPress with a global viewer for all panoramas on your site
6. Upload your KRpano Pano2VR, or Flash Panorama Player panoramas to your site via ftp
7. Enter the shortcode in your post
Workflow 4: Hosting your Pano to Pano sites
The easiest so far is using site to host your spherical panorama, like www.360cities.net, but I am not sure with this. I beleive that the one I did is in jeopardy of loosing the hosting, because it was not a real city nor a real environment. All you need to is to sign up and upload your image. Then you can choose what type you want. Here is the hosted image.
Vray Spherical in France
It is important to Vray SketchUp will create your panoramas but not the movie. Therefore you will need a different piece of software - a "viewer" to display the panorama as a movie or in the web page. The viewer like Quicktime for instance need two things: first the image itself, and second the information about the image, such as whether it is 360 degrees wide or less than that, whether the image file is cylindrical2 or spherical2, cubic, fish eye, projection, etc. Using quicktime, flash are excellent since you dont have to use web to view them. All you need is a flash player movie or a quicktime movie.
Here is the simple workflow how to put now your spherical render.
Workflow 1: Using Pano2VR. You can download the shareware here.
Step 1: Open Pano2VR

Step 2: Input
Type: Auto Panorama: Spherical
Browse the location of the rendered image in Vray SketchUp

Step 3: Panorama Parameters
You can adjust the panorama parameters. In my case, I did not touch it.

Step 4: Output
Enter your output. In my case I used quicktime

That's it.
Here is my finish one using pano2Vray shareware program. If you want to download click HERE.
Some other workflow as follows:
Workflow 2: Using GoCubic
Tutorial from Panoguide HERE.
Workflow 3: Using Pano Press
Another cool way using using PanoPress. You have to have Wordpress install
1. Download & unzip Panopress
2. Upload Panopress to your wp-plugins folder
3. Activate Panopress in your WordPress admin plugins page
4. Configure Panopress settings in the admin page
5. Optional: Upload your KRPano or Flash Panorama Player global swf file if you are using PanoPress with a global viewer for all panoramas on your site
6. Upload your KRpano Pano2VR, or Flash Panorama Player panoramas to your site via ftp
7. Enter the shortcode in your post
Workflow 4: Hosting your Pano to Pano sites
The easiest so far is using site to host your spherical panorama, like www.360cities.net, but I am not sure with this. I beleive that the one I did is in jeopardy of loosing the hosting, because it was not a real city nor a real environment. All you need to is to sign up and upload your image. Then you can choose what type you want. Here is the hosted image.
Vray Spherical in France
How to Clear Your Browser's Cache - wikiHow
How to Clear Your Browser's Cache - wikiHow: "Firefox 3.5 / 3.6 / 4.0
1 Tools > Clear Recent History Click the Tools menu, then select Clear Recent History.
2 Everything Choose the time range of cache you'd like to clear.
3Cache Click on Details and make sure Cache is checked.
4 Select Clear Now."
None of this work in the end I went back to the old interface. that solves the problem.
I have a difficulty with my Blog
This is frustrating, I can't use the blog interface. In the end I have to use Chrome.
Saturday, 7 May 2011
WIP: VR in Vray SketchUp
This is a work in progress. My interest in creating a VR can be traced long time ago. way way back when I was using Max Release 1.5. I would like to try one here using Google Sketchup right after I posted and interesting tutorial using Vray for Rhino. Check it out HERE.
How did I start in SketchUp?
Here is a screen grab on the scene I used for my IES tutorial. Basically, I placed my camera in the middle of the room. I created a line and place the camera here.
2. All you need to do is to adjust the height of the camera by moving it long the Z axis. Here is my screen grab. The camera is about 1.2 meter above the floor level.
3. Camera type:. In Vray SKetchup the Camera type must be Spherical and the Field of View (FOV) must be 359.9 degrees.
4. Image aspect ratio
Lastly the image aspect ratio in vray must be 2.0 where the width is 2 times the height. In the Vray output size, tick Override Viewport. Image below shows the image output I am using.
5. Here is the render
Wednesday, 4 May 2011
Nomeradona Definitive Lighting Guide part 2
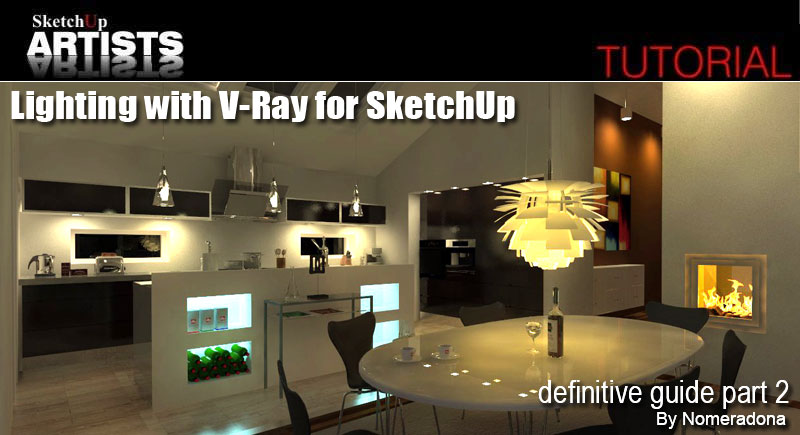 |
You can access now my second definitive guide "lighting with Vray SketchUp at SketchupArtists.org
CLICK the LINK HERE
1. What is Emissive Material?
Emissive Material is actually a special material layer of V-Ray for SketchUp used for producing self-illuminated surfaces. It also allows a plane, a face or an object applied with this material to turn into an actual light source. In other rendering engines, they call this a “self-illuminating material” or in V-Ray Max it is equivalent to V-Ray Light Material. When I first used V-Ray for SketchUp, I was not encouraged to use pure Emissive Material to light up my model. The reason was blotchiness…. is this the case though? Can I possibly produce quality rendering just by using Emissive lighting?
In this 2nd Part of my tutorial, I will try my best to share my knowledge and my experience in using Emissive material. But before that, let me reintroduce the basic function of it and how you can access this in V-Ray for SketchUp. Emissive material is normally used as self illuminating material for glow sticks, neon’s, bulbs and LED lights. I will be using this simple scene to show you how to access this material easily. Again, just like my part 1 tutorial in this series, the Camera and Physical Sky are turned off. This means I will be relying totally on Emissive materials to light up my scene.
2. Accessing the V-Ray Light material
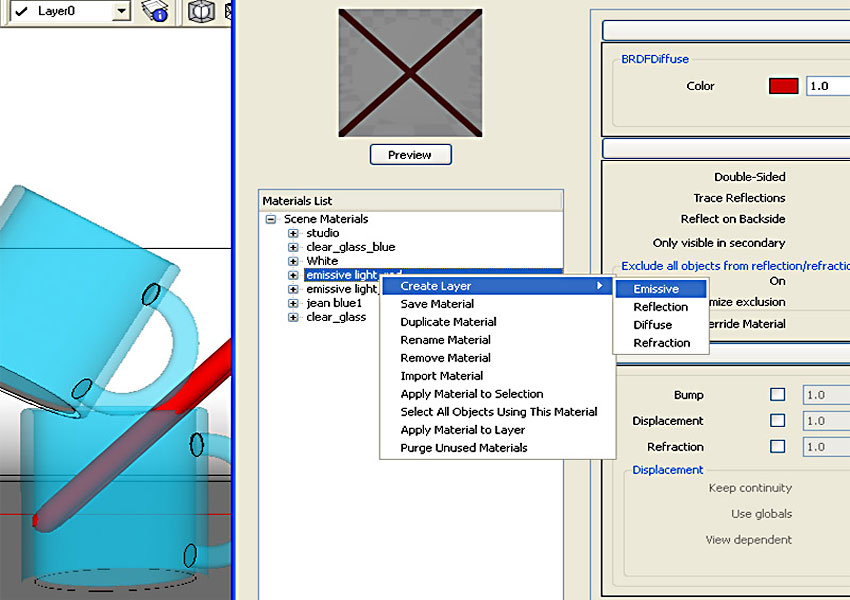
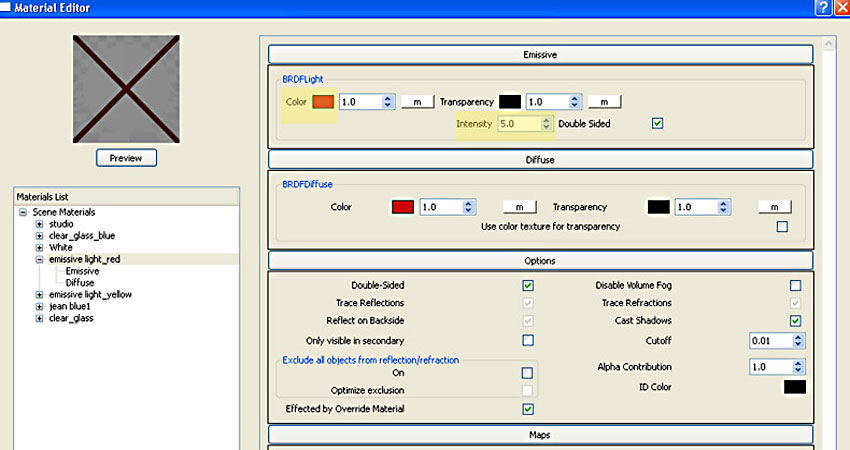
This one is pretty simple. Open the V-Ray Material Editor. Create material, highlight this material and “right-click” your mouse button. Select “Create Layer” and then select “Emissive”. Click the Emissive Layer then and place it on your material stacks. See the image below for reference.
The parameters of the Emissive Layer are: Color will be the color of your Emissive Light/ Transparency, Intensity controls the power of your Emissive material. Check Double-Sided, which means both negative and positive faces will have an Emissive Layer. You can load bitmaps on both Color and Transparency boxes, by clicking the lower case “m” on the boxes.
Here is a quick render without using V-Ray for SketchUp default Visopt (Sun, Physical Camera turned off).
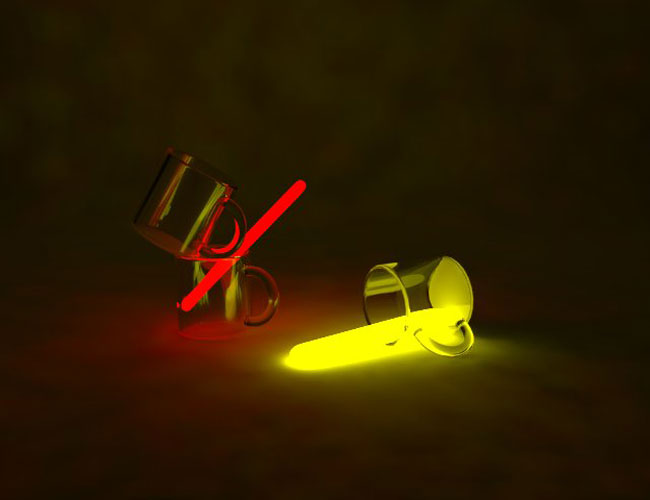 | |
| Intensity 5 |
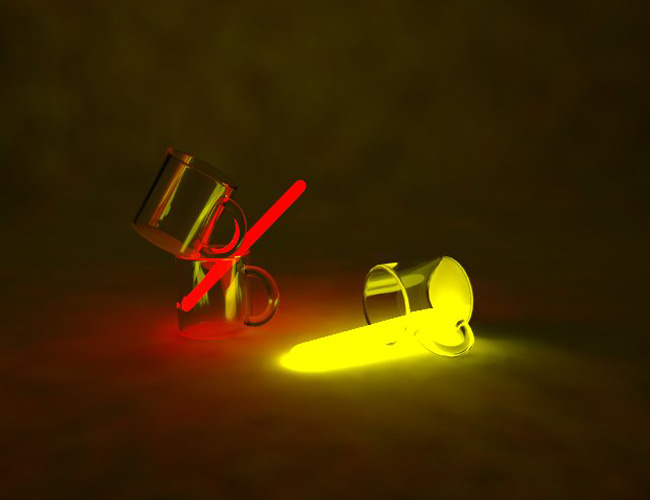 | ||
| Intensity 10 |
There is a way on how to remove blotchiness. I basically increase the HSph Subdivs of my Irradiance map.
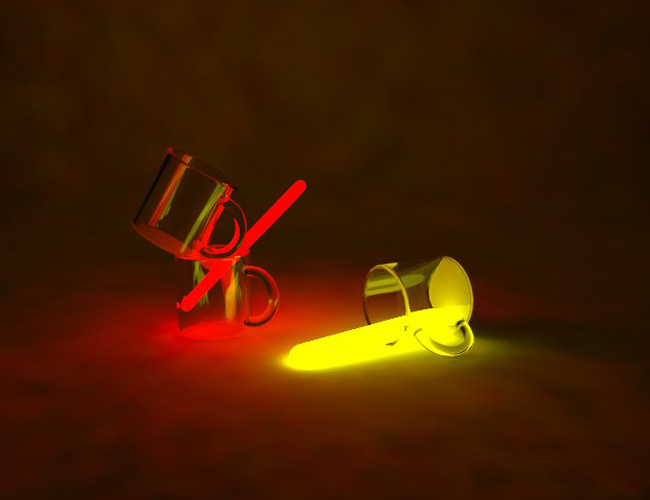 | |
| hsph subdivision = 50 |
 |
| hsph subdivision = 150 |
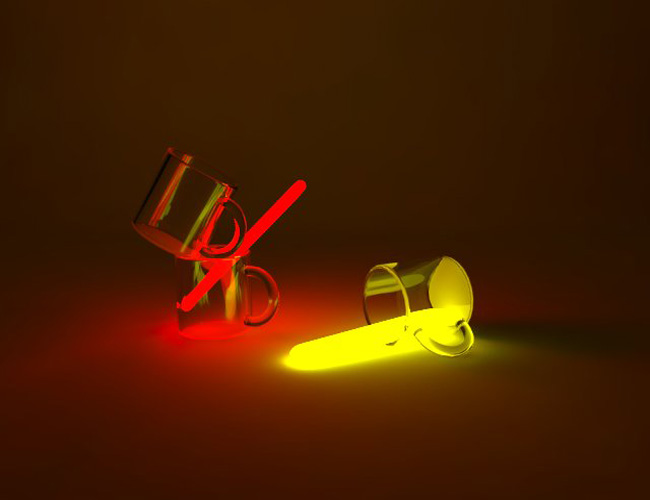 | |
| hsph subdivision = 250 |
Conclusion: blotchiness can be removed in V-Ray for SketchUp by increasing the HSph Subdivs using the Irradiance map engine.
3. Combining with Image Based Lighting (IBL) using HDRI (High Dynamic Range Images)
I believe Emissive Lighting and IBL are almost same. The only difference is that the image used as IBL is a 32 bit image, while the color/image applied to create a self illuminating surface is 8 bit. Since HDRI lighting will be a separate topic in this series, I won’t focus on this type of lighting at the moment. In the next image I combined emissive lighting and IBL using HDRI in the environment (Note: HDRI will be tackled later in the this series of tutorials). The render below had a very low HDRI’s Bitmap Gamma.
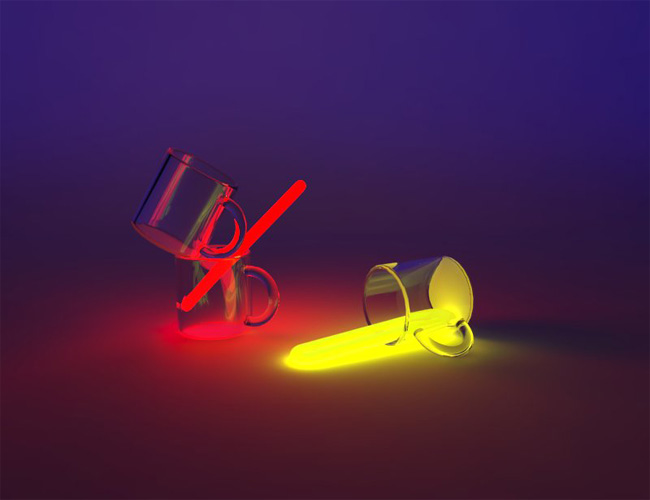 |
| Emissive Lighting,IBL and HDRI |
Adding Reflection Layer:
One of the best features of the latest release of V-Ray for SketchUp is the ability to stack layers. In the next render I added a Reflection Layer with a Fresnel Map type. The next render shows a slight reflection thus creating a much more believable surface. I also added a material to the studio surface.
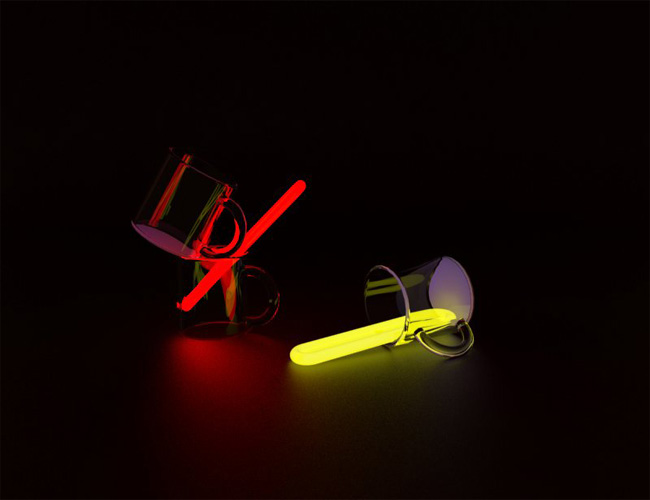 |
| Reflection Layer |
4. Using Bitmap as Emissive lighting
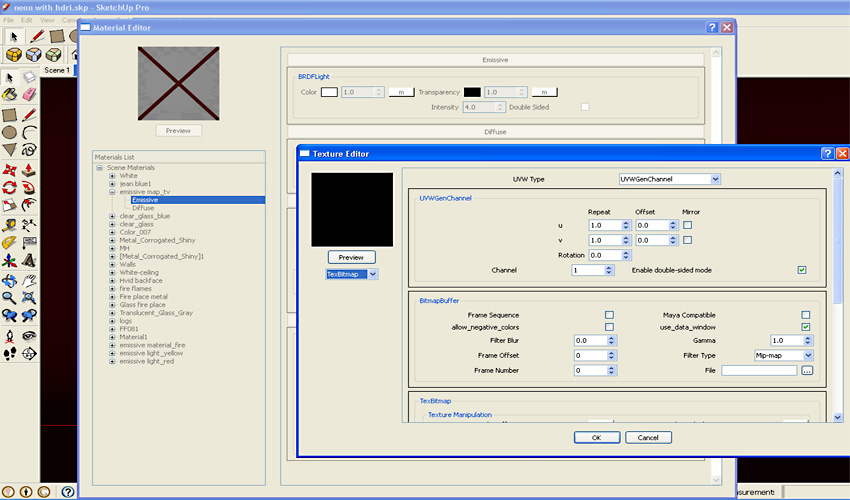
Bitmaps can also be added and create emissive lighting by using them. This is very easy to achieve in V-Ray for SketchUp. Once you have created an Emissive Map Layer, you can actually load a bitmap. This bitmap will then be used as self emitting material. This is useful for TV screens, fire, glowing backgrounds and candle light material.
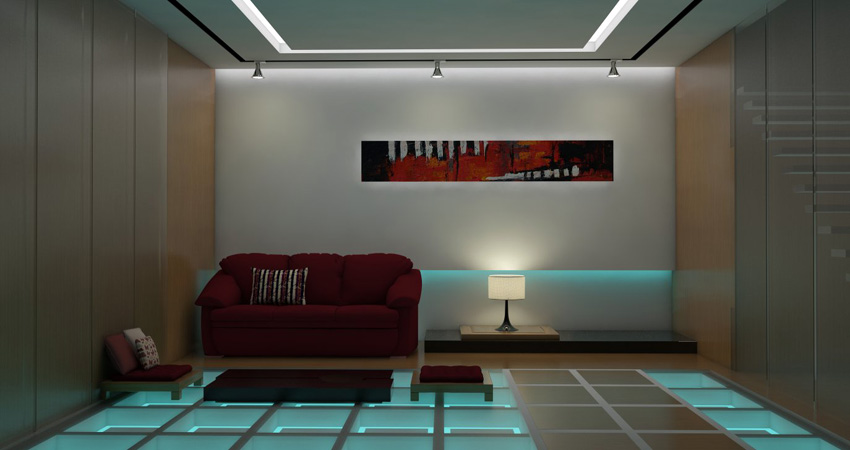
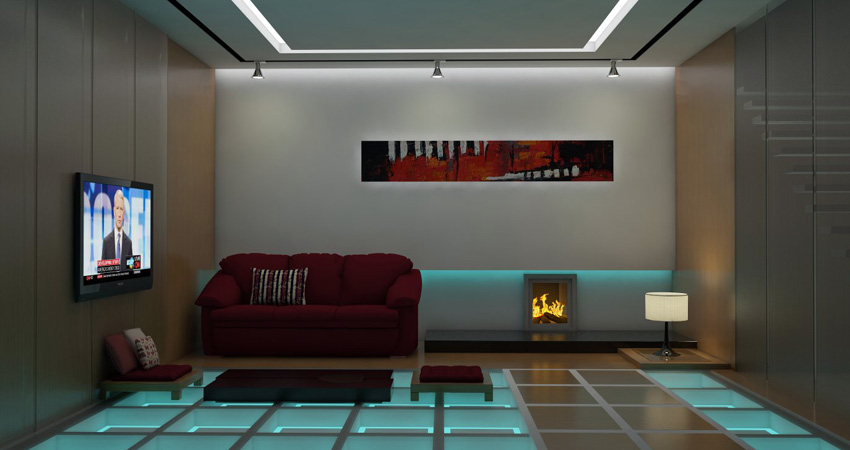
Below is a simple scene that I will use to demonstrate how to place a TV screen map and how to create fire to effectively light my fireplace.
For this TV, I need to apply the map correctly to the TV screen. Again this is very easy to achieve in Google SketchUp. I won’t go into details on how to do this, instead I will focus on the TV material in this tutorial.
Note: Bear in mind that any UV tiling with bump, displacement, dirt, transparency etc. V-Ray for SketchUp follows the UV tiling of the diffuse map.
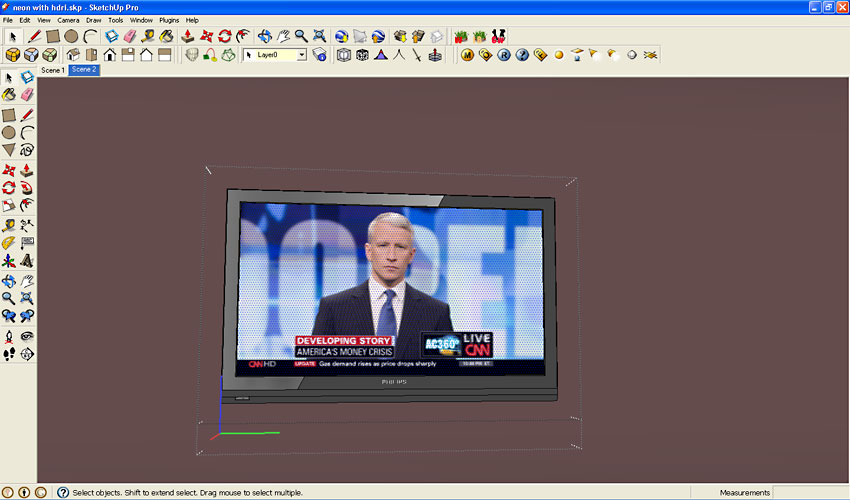 |
| Apply Map to TV Screen |
Now, all we need to do now is to apply the Emissive map. This time instead of using Emissive Color, we will load the same Diffuse map on to the Emissive Layer. The Intensity will control the power of this map. See image below.
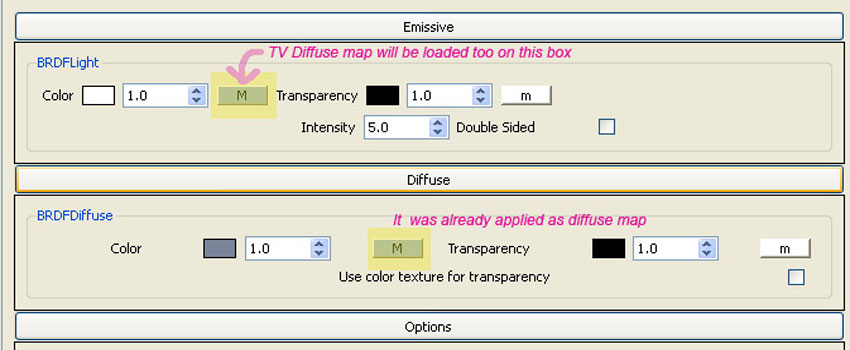 | |
| Emissive and Diffuse material setting |
Here is the render with multiplier = 1.0. No Physical Camera, no Sun, no IBL.
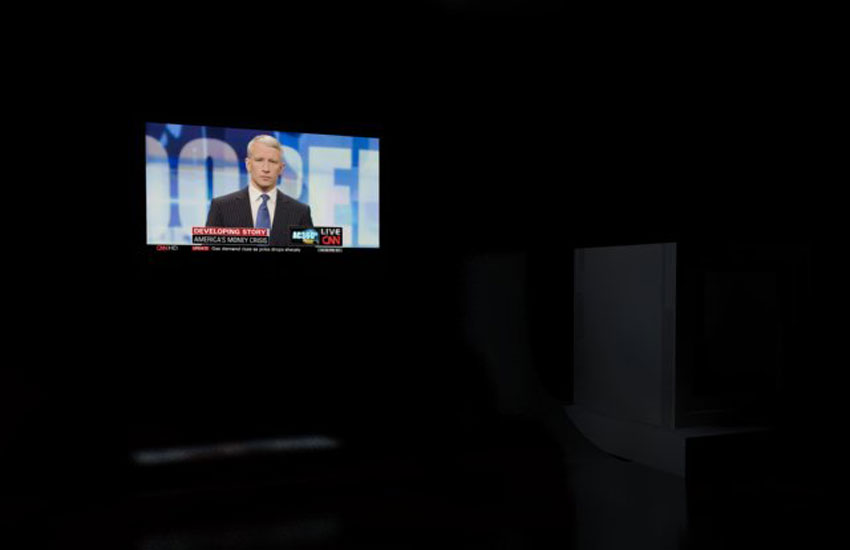 |
| Intenisty 1.0 |
 | |
| Intensity 2.0 |
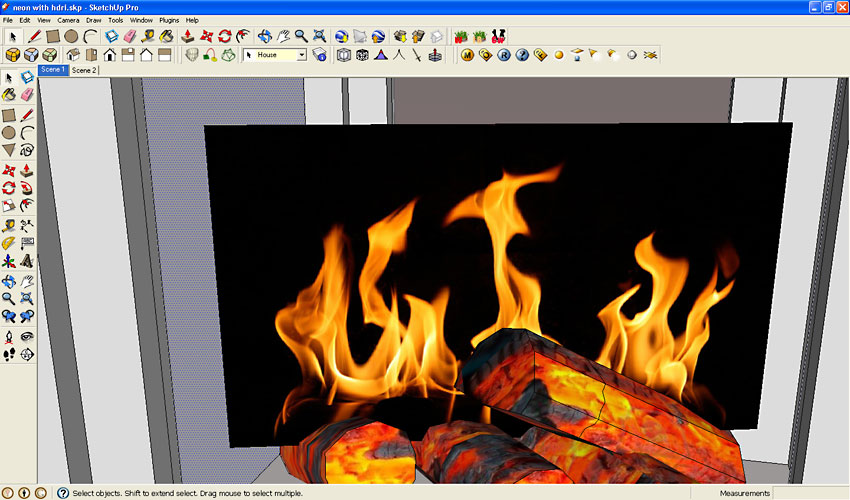
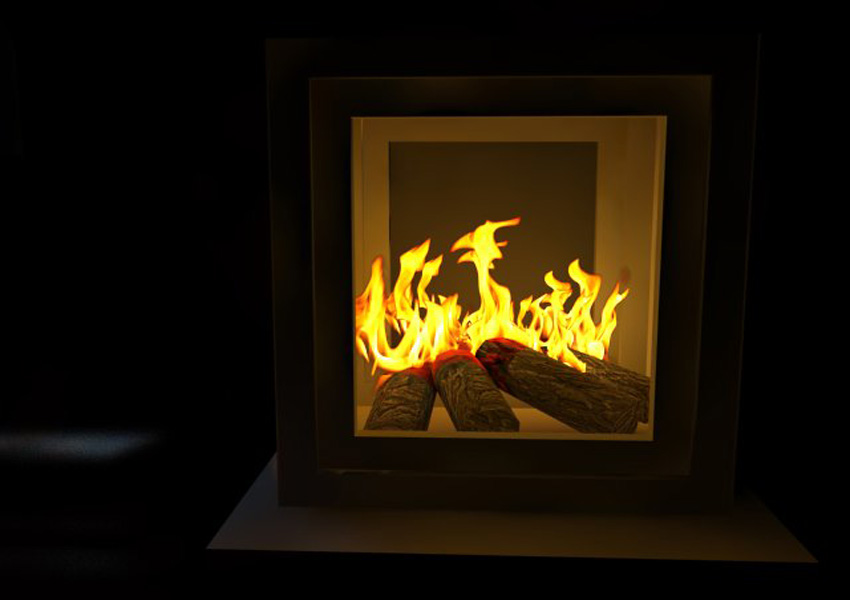
5. Creating the Self Emitting Fire Material
For the fireplace, I will be using the material shown below. I downloaded this material from the Internet. I repainted the background and cropped it.
 |
| Fire Texture image |
To create the fire material, create a rectangular face inside the fire place. Here is a sample below.
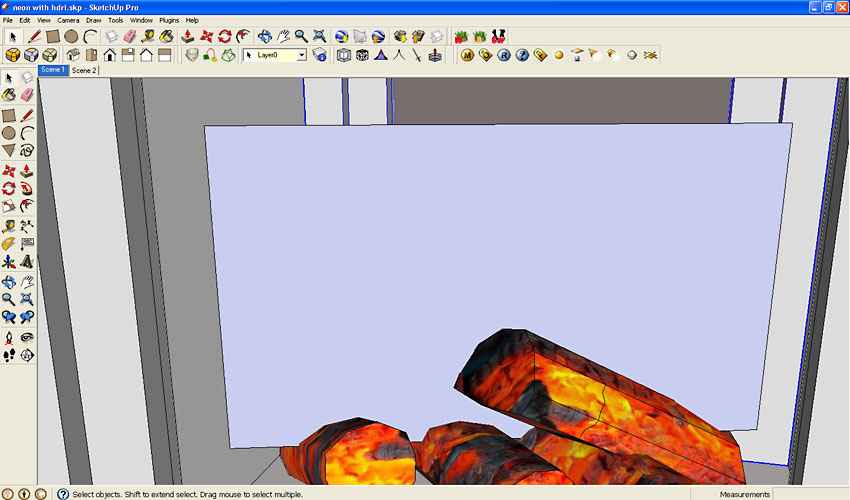 |
| Create Face for image |
Then I applied the fire material to the face.
5.1 Creating the Transparency Map in Photoshop
Now we will create the Transparency map in Photoshop, to remove the black area. Alternatively you can create a PNG file with Transparency click Use Color Texture for Transparency. But me I like the old way.
a. I open my fire Diffuse map in Photoshop.
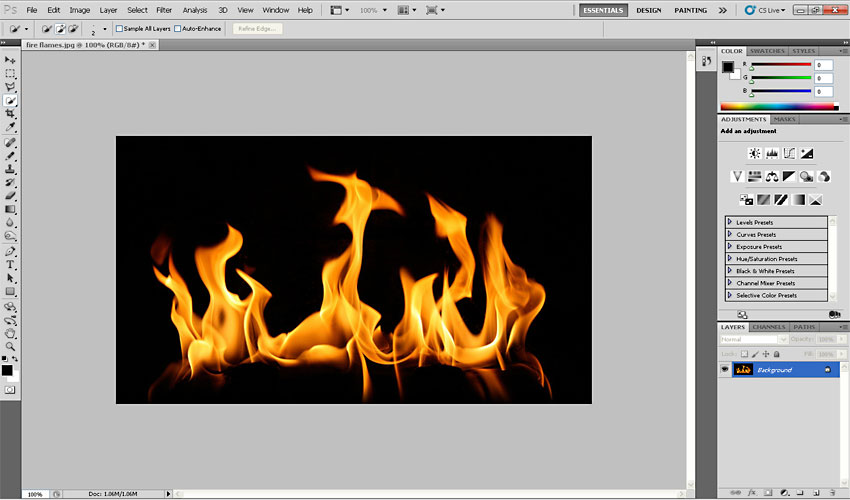 |
| Open Map in Photoshop |
b. Double click the Background Layer to make it Layer 0
c. Create new Layer and Fill it with white and place it under the Layer 0 (your fire material)
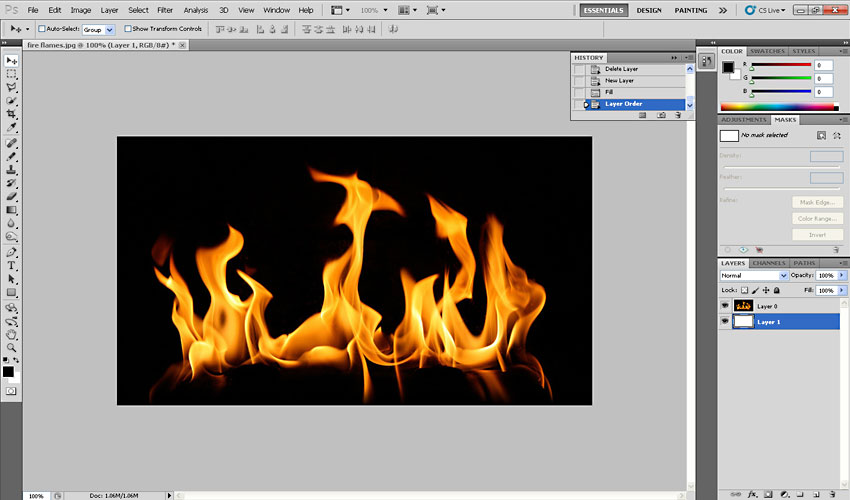 |
| Create new layer and fill |
d. Highlight Layer 0 and click Select;Color Range (make sure Selection is chosen). Use the Eyedropper Tool and select the black area in the actual image and adjust Fuzziness. Then click ok.
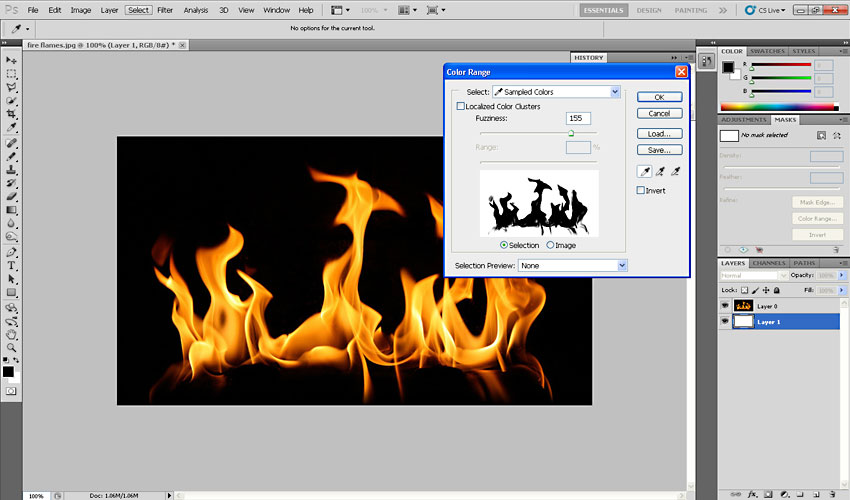 |
| Select Color Range |
e. Click Layer, Vector Layer Mask .
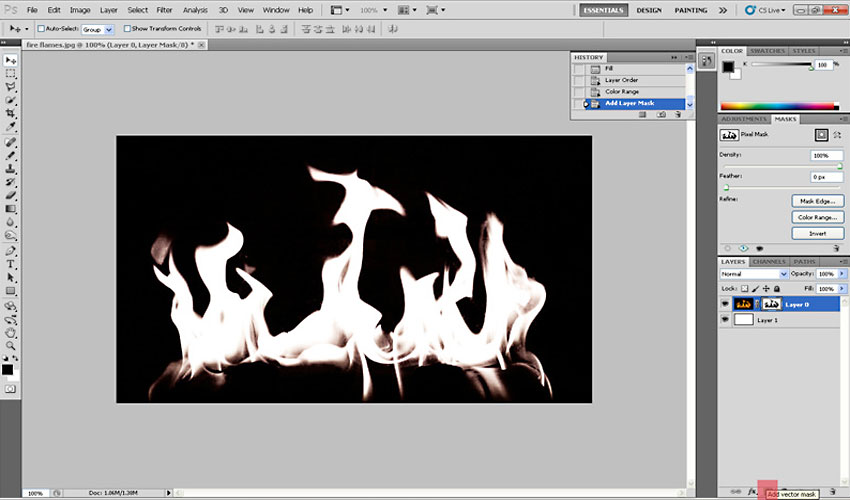 |
| Add Vector Mask |
Note: the good thing with adding a mask is you are doing non-destructive editing and at the same time you can always use an array of options in manipulating the mask. You can actually do this, but I will invert in now, so that later you won’t have to invert this map in V-Ray for SketchUp.
f. Select the Mask option and click Invert or go to Image>Adjustments>Invert.
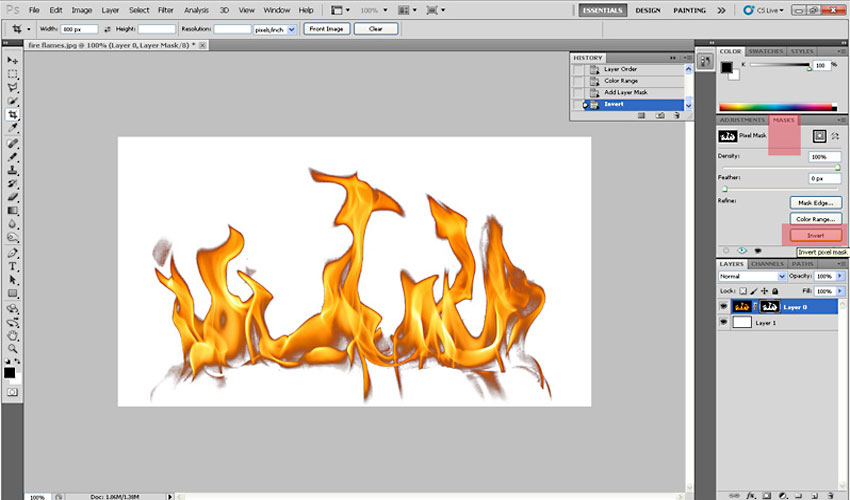 |
| Invert |
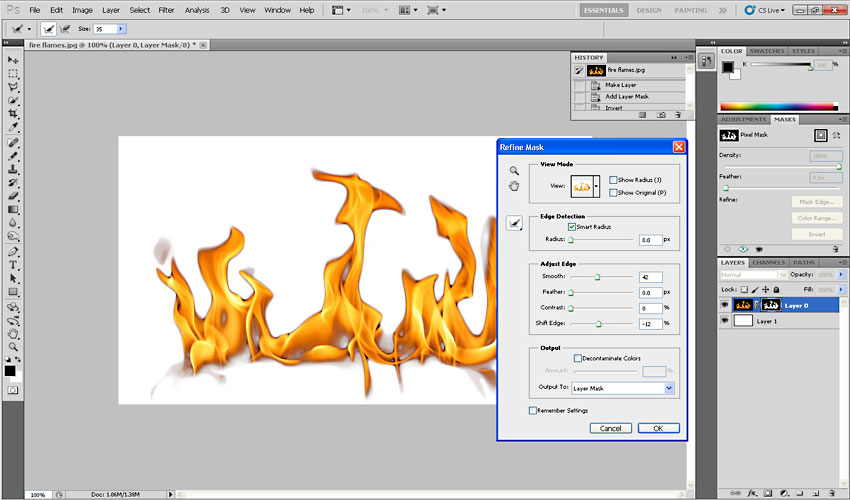
g. You may want to refine the edge of the mask by clicking “Refine Mask Edge”. Here you can avoid the halos’ you can get and smoothen and feather the mask and even availing the edge detection. This is cool of you are using a lot of 2D transparencies like plants, people etc.
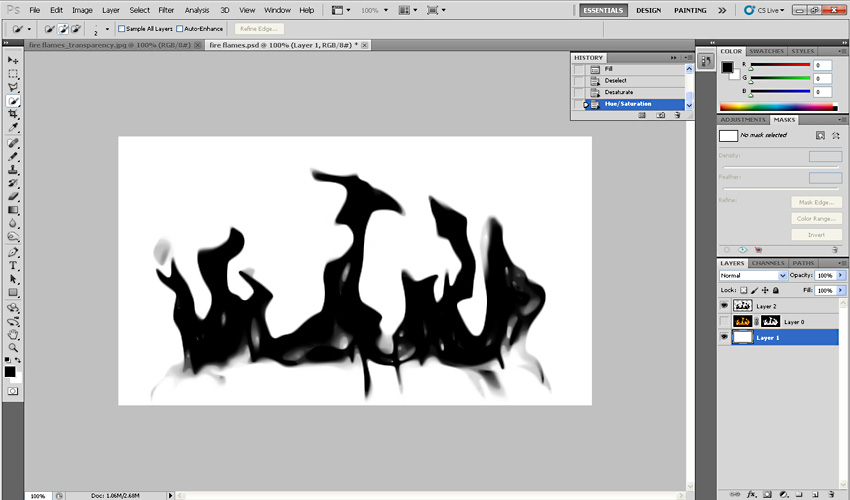
h. Now right click on the Mask, click Add Mask to Selection. Once selected, create a new Layer and Fill the selection with black.
i. Now unhide Layer 0 and save your Transparency map.
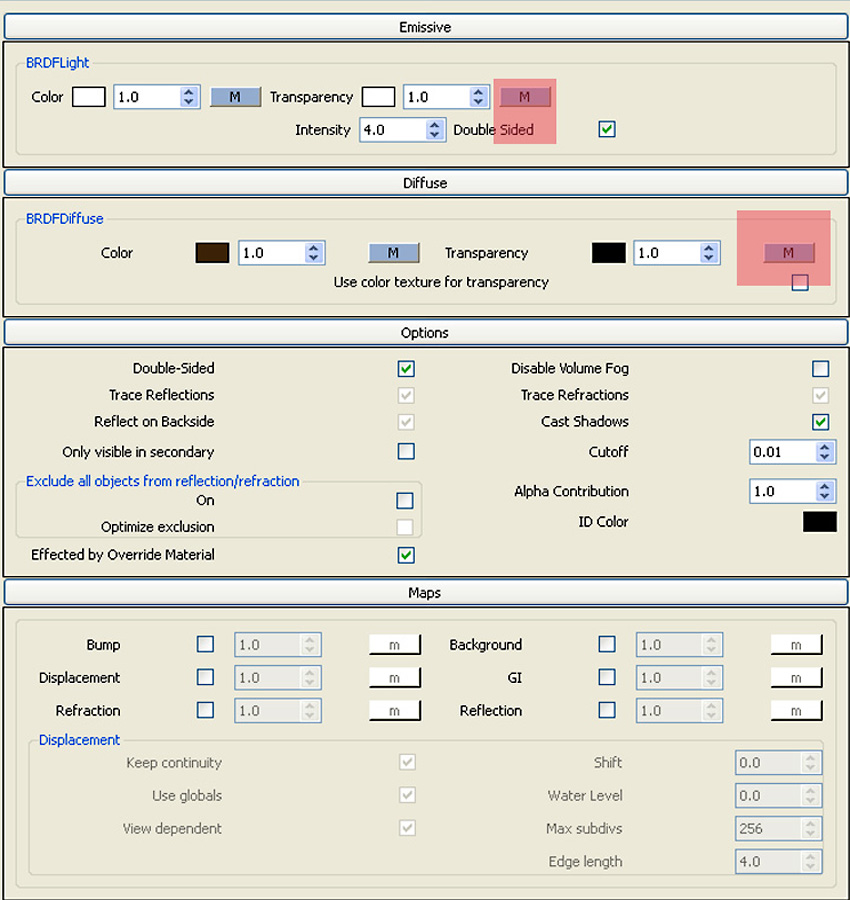
5.2 Applying the transparency map in V-Ray for SketchUp
In the image below, I loaded the Transparency maps using the following settings. Note the areas highlighted in red.
Below is the render after using the Transparency maps.
Now I added some more planes, re-sized and rotated. It’s better to have different maps, but for this particular tutorial, I will leave it like this.
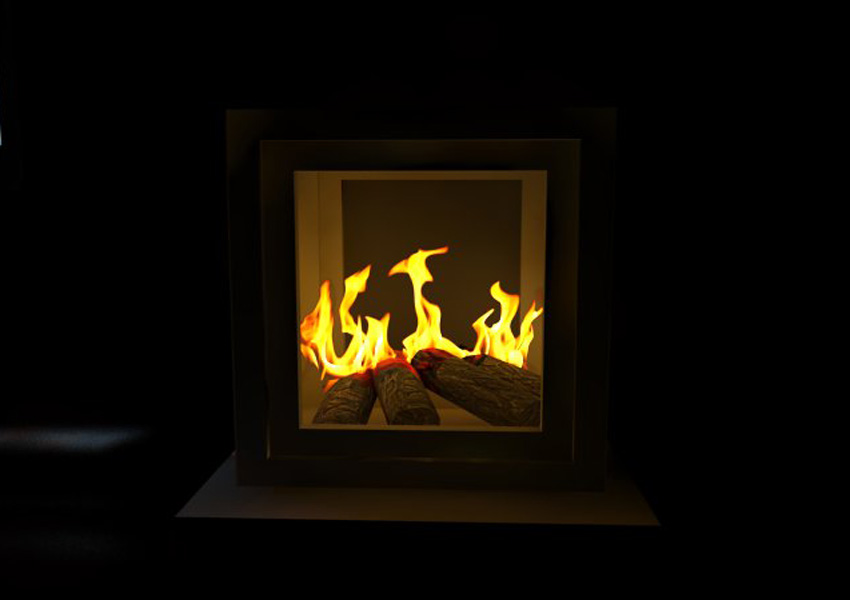
So here is the TV and fireplace together. Not the greatest combination though.
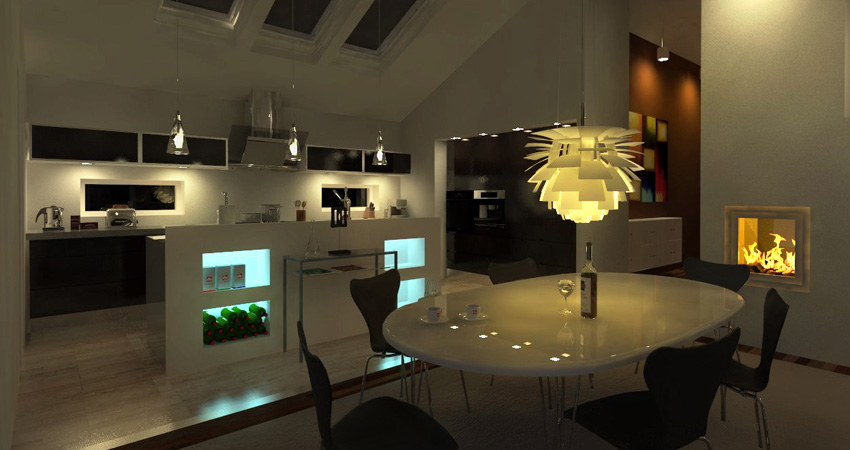
Finally some renders where I only use Emissive materials.
Thanks for following my mini series……there is more to come!
Cheers
Nomer
Subscribe to:
Posts (Atom)
Bedroom Interior Rendering
